

For many indie developers, launching a demo is the first opportunity to put their game into players’ hands.
A well-designed Steam demo can generate valuable feedback, increase wishlists, attract streamers, and significantly improve your game’s visibility before launch. Events like Steam Next Fest have made demos one of the most effective marketing tools available to independent studios.
However, creating a demo isn’t as simple as cutting your game in half and publishing it.
A successful demo should showcase your game’s strengths, leave players wanting more, and encourage them to wishlist the full release.
In this guide, you’ll learn how Steam demos work, how to create one using Steamworks, and how to use your demo as part of a broader marketing strategy. We’ll also use Velato, a poker roguelike, as a practical example throughout the article.
Table of Contents
- What Is a Steam Demo?
- Why Every Indie Game Should Consider a Demo
- Demo vs Playtest vs Prologue
- Planning Your Demo
- Creating a Demo in Steamworks
- Preparing Your Demo Build
- Marketing Your Demo
- Steam Next Fest Strategy
- Demo Checklist
- FAQ
What Is a Steam Demo?
A Steam demo is a free version of your game that players can download directly from your Steam Store page.
Unlike free weekends or limited-time trials, a demo is usually a permanent offering that introduces players to your game before purchase.
Its primary goals are to:
- Introduce gameplay.
- Build player confidence.
- Increase Steam wishlists.
- Collect feedback.
- Generate community discussion.
Rather than replacing your full game, the demo acts as a preview designed to encourage players to buy the complete experience.
Why Steam Demos Matter More Than Ever
The Steam marketplace becomes more competitive every year.
Thousands of new games launch annually, making it increasingly difficult for indie titles to stand out.
A demo helps reduce uncertainty.
Instead of asking players to trust screenshots and trailers alone, you’re inviting them to experience the game firsthand.
This often leads to:
- Higher wishlist conversion.
- Better community engagement.
- More YouTube coverage.
- Increased streamer interest.
- Stronger launch momentum.
For small studios with limited marketing budgets, a polished demo can be one of the highest-return investments.
How Steam Demos Work?
A Steam demo is a separate application linked to your main game.
Players can install it directly from your Store page without purchasing the full version.
Although the demo has its own App ID inside Steamworks, it remains closely connected to the base game.
This allows players to:
- Download the demo.
- Play a limited version.
- Wishlist the full game.
- Purchase the complete release.
- Automatically navigate between both Store pages.
Steam makes this process seamless, helping convert demo players into customers.
Demo vs Playtest vs Prologue
These three options serve different purposes.
Understanding the differences helps you choose the right strategy.
| Steam Demo | Steam Playtest | Prologue |
|---|---|---|
| Public | Invitation or approval based | Separate Steam game |
| Marketing focused | Testing focused | Story or standalone introduction |
| Appears on Store page | Separate registration flow | Independent Store page |
| Designed to increase wishlists | Designed to gather feedback | Builds awareness and branding |
Choose a Demo when your goal is marketing.
Choose a Playtest when your goal is testing unfinished features.
Choose a Prologue when you want to publish a standalone experience that can attract its own audience.
Why Indie Developers Should Release a Demo?
Large studios often rely on massive advertising campaigns.
Indie developers rarely have that luxury.
A demo allows your gameplay to become your marketing.
Instead of telling players your game is fun, you let them experience it.
This creates trust and often results in:
- Organic word-of-mouth.
- Community discussions.
- Better Steam reviews after launch.
- Increased creator coverage.
- More informed purchasing decisions.
For many indie games, the demo becomes the strongest marketing asset after the Store page itself.
When Should You Release a Demo?
Timing matters.
Releasing too early can expose unfinished systems.
Releasing too late may not leave enough time to build momentum before launch.
A common timeline looks like this:
6–12 Months Before Launch
↓

Internal Demo

↓

Closed Playtest

↓

Public Steam Demo

↓

Steam Next Fest

↓

Collect Feedback

↓

Improve Game

↓

Launch
This approach gives you enough time to iterate based on player feedback while building wishlists.
Planning Your Demo
Before opening Steamworks, define what your demo should accomplish.
Ask yourself:
- What is the core gameplay loop?
- Which feature makes the game unique?
- What should players remember after finishing the demo?
- Where should the demo end?
A demo isn’t meant to include every mechanic.
Its purpose is to create curiosity.
The ideal ending should leave players wanting to continue.
How Long Should a Steam Demo Be?
There isn’t a universal answer.
The right length depends on your genre.
As a general guideline:
| Genre | Recommended Demo Length |
|---|---|
| Roguelike | 20–40 minutes |
| Deckbuilder | 30–60 minutes |
| Platformer | 20–30 minutes |
| Action RPG | 30–60 minutes |
| Strategy | 45–90 minutes |
| Simulation | 45–90 minutes |
The goal isn’t maximizing playtime.
The goal is maximizing interest.
It’s better to deliver thirty excellent minutes than two repetitive hours.
Case Study: Planning a Velato Demo
Imagine Velato preparing for Steam Next Fest.
Instead of exposing every card, relic, enemy, and progression system, the demo could focus on teaching the game’s core identity.
A possible structure might include:
- Tutorial introducing poker-based combat.
- One playable character.
- A limited selection of cards.
- A small number of enemy encounters.
- One mini-boss.
- One memorable boss fight.
- A teaser for advanced mechanics available in the full game.
Players finish the demo understanding exactly why Velato is different while still having plenty left to discover in the full release.
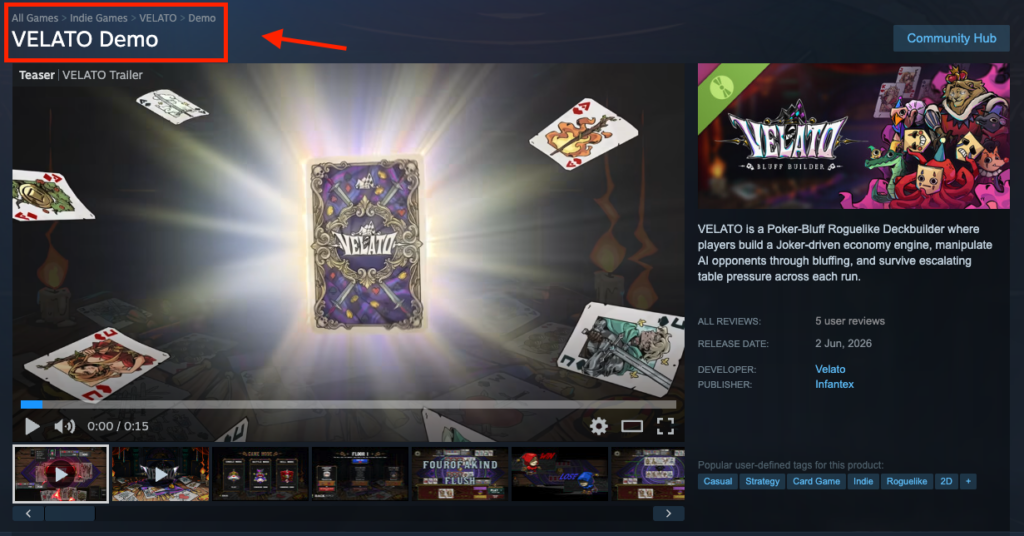
Velato Demo Page: https://store.steampowered.com/app/4639660/VELATO_Demo/
What Makes a Great Demo?
Successful demos usually share the same characteristics.
They are:
- Short enough to maintain excitement.
- Long enough to demonstrate depth.
- Technically polished.
- Easy to understand.
- Representative of the final game.
Most importantly, they end at a moment that naturally encourages players to wishlist the full version.
Think of your demo as the first chapter of a novel.
It should satisfy the player while making them eager to continue.
Common Misconceptions About Steam Demos
Many first-time developers believe a demo should contain as much content as possible.
In reality, more content isn’t always better.
A demo is not:
- A free version of the full game.
- A technical showcase.
- A complete tutorial covering every mechanic.
- A substitute for your launch build.
Instead, it’s a carefully curated experience designed to showcase your game’s strengths and convert interest into wishlists.
Creating a Steam Demo in Steamworks
Once you’ve planned your demo, the next step is configuring it correctly inside Steamworks.
Although creating a Steam demo isn’t technically difficult, it’s important to understand how Steam organizes applications and how your demo connects to your main game.
A properly configured demo provides a seamless experience for players while keeping your development workflow organized.
Step 1: Create a Demo App
In Steamworks, a demo is created as a separate application linked to your base game.
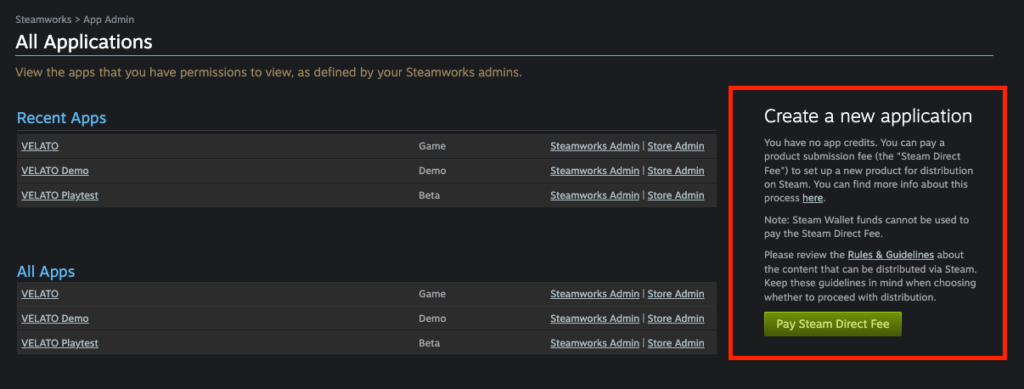
This means your demo receives its own:
- App ID
- Builds
- Depots
- Packages
- Configuration
However, players will still discover it through your main Store page.
A simplified workflow looks like this:
Base Game

↓

Create Demo App

↓

Steam generates Demo App ID

↓

Link Demo to Base Game

↓

Upload Demo Build
Keeping the demo separate gives you greater flexibility for updates and testing without affecting the full game.
Step 2: Link the Demo to Your Base Game
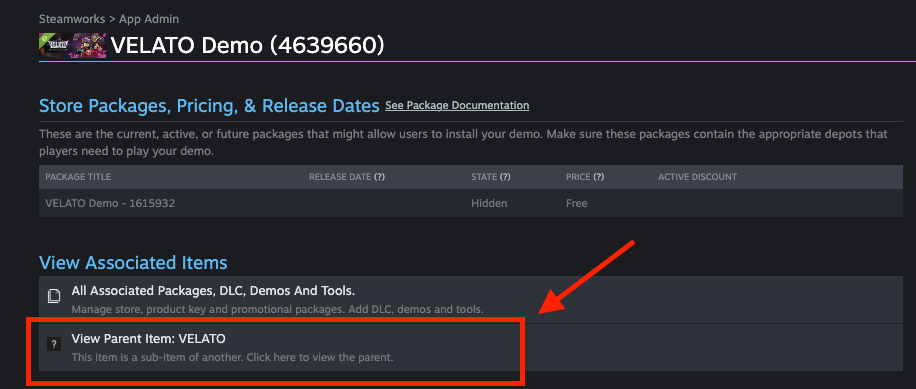
After creating the Demo App, you’ll need to associate it with the main game.
This connection ensures:
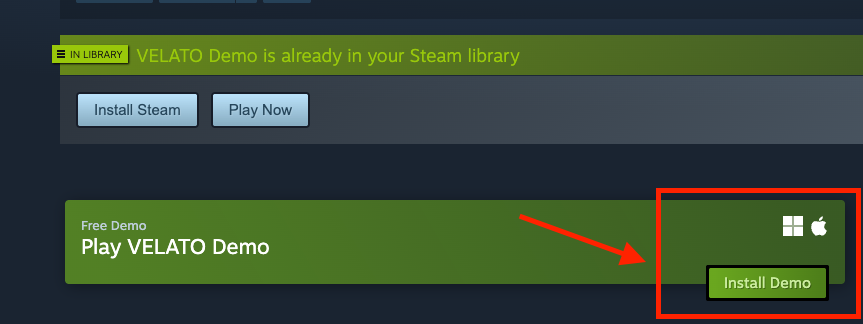
- The “Install Demo” button appears on your Store page.
- Players can easily navigate between the demo and the full game.
- Wishlists continue to point toward the main title.
- The demo benefits from your existing Store presence.
Always verify that the demo is linked to the correct base application before publishing.
Step 3: Configure Your Store Page
One advantage of Steam demos is that they normally use the same Store page as the base game.
Players don’t need to search for a separate listing.
Instead, they’ll see a clear option to install the demo directly from your game’s page.
Before publishing, review every section of your Store page, including:
- Capsule artwork
- Trailer
- Screenshots
- Description
- Supported languages
- System requirements
- Controller support
Your demo may be free, but it still represents your game to potential customers.
Step 4: Prepare a Dedicated Demo Build
Avoid using your development build as the public demo.
Instead, prepare a dedicated version that contains only the content intended for players.
Typical changes include:
- Locked progression.
- Limited levels.
- Restricted character selection.
- Disabled developer tools.
- Optimized save handling.
- Updated title screen identifying the build as a demo.
This helps reduce bugs while creating a more polished first impression.
Organizing Depots
Steam uses depots to manage game content.
For many indie projects, you’ll have separate depots for:
- Windows
- macOS
- Linux
- Optional downloadable content
Your demo can reuse many of the same assets as the full game, but avoid shipping unnecessary files that increase download size.
A clean depot structure also makes future updates easier.
Using Branches for Testing
Before releasing your demo publicly, test it through private branches.
Common branches include:
| Branch | Purpose |
|---|---|
| Default | Public build |
| Beta | Internal QA |
| Preview | External testers |
| Experimental | New features |
Branches allow you to verify updates before they reach players.
Even solo developers benefit from testing changes in a separate branch.
Uploading Your Demo with SteamPipe
SteamPipe is Valve’s content distribution system used to upload game builds.
A typical workflow looks like this:
Create Build

↓

SteamPipe Upload

↓

Assign Build

↓

Publish Build

↓

Internal Testing

↓

Release
Whenever possible, automate your build process to reduce human error.
Consistent version numbering also makes troubleshooting much easier.
Steam Cloud Considerations
If your full game supports Steam Cloud, think carefully about how the demo should interact with saved data.
Common approaches include:
Option 1
Separate save files.
Advantages:
- Prevents conflicts.
- Keeps demo progress isolated.
Option 2
Compatible save migration.
Advantages:
- Players continue from where the demo ends.
- Smooth transition into the full game.
This approach is particularly valuable for RPGs, simulations, and longer strategy games.
Should Demo Progress Carry Over?
Many players appreciate being able to continue their adventure after purchasing the game.
If technically feasible, consider allowing:
- Character progression.
- Unlocks.
- Settings.
- Controller preferences.
However, make sure players cannot exploit demo saves to bypass progression or unlock premium content unintentionally.
Performance Matters
A demo is often someone’s first impression of your game.
Optimize before release.
Focus on:
- Stable frame rates.
- Fast loading times.
- Minimal crashes.
- Responsive controls.
- Smooth transitions between scenes.
Even a visually impressive game can lose potential customers if the demo feels unstable.
Controller Support
Steam users increasingly expect controller compatibility.
If your game supports controllers, verify that players can complete the entire demo without needing a keyboard or mouse.
Test:
- Menu navigation.
- Gameplay controls.
- Pause screens.
- Rebinding.
- Button prompts.
Nothing damages confidence faster than a controller-supported Store page with a broken controller experience.
Ending the Demo Gracefully
The ending of your demo deserves just as much attention as the beginning.
Avoid abrupt messages such as:
“Demo Over.”
Instead, reward the player for finishing.
A better sequence might be:
Boss Defeated

↓

Victory Screen

↓

Thank You for Playing

↓

Wishlist the Full Game

↓

Coming Soon
This creates a positive final impression while naturally encouraging wishlists.
Case Study: Structuring the Velato Demo
Imagine Velato launching a public demo before Steam Next Fest.
Rather than exposing every system, the demo could focus on one polished gameplay slice.
A possible structure could include:
- A short interactive tutorial explaining poker-based combat.
- One starting character with a curated starter deck.
- A limited pool of cards to demonstrate bluffing mechanics.
- Two or three enemy encounters introducing different tactical decisions.
- One mini-boss that encourages players to experiment with card combinations.
- A climactic boss battle that showcases the game’s strategic depth.
After the final encounter, the game could display:
- A summary of the player’s run.
- Statistics such as damage dealt, successful bluffs, and cards played.
- A preview of locked characters, cards, and relics available in the full version.
- A clear invitation to wishlist the game before launch.
This approach gives players a satisfying experience while leaving meaningful content to discover later.
Testing Before Release
Never publish a demo without thorough testing.
Use a checklist that includes:
- Fresh installation.
- Save and load functionality.
- Achievement behavior.
- Controller compatibility.
- Language selection.
- Resolution settings.
- Steam Overlay.
- Cloud synchronization.
- Performance across different hardware.
Whenever possible, invite external testers who have never played your game.
New players often identify usability issues that developers overlook.
Common Mistakes When Publishing a Steam Demo
Many first-time developers make similar mistakes.
Avoid these pitfalls:
- Releasing the demo before the core gameplay feels polished.
- Including too much content and reducing the incentive to buy the full game.
- Ending the demo without a clear Wishlist call-to-action.
- Using placeholder artwork or unfinished UI.
- Publishing with unstable performance or frequent crashes.
- Forgetting to test controller support.
- Shipping unnecessary files that increase download size.
- Breaking compatibility between demo and full-game saves.
- Leaving obvious debug tools or developer menus enabled.
- Failing to update the demo after major gameplay improvements.
- Ignoring player feedback collected during the demo period.
- Not aligning the demo with the current Steam Store page, causing a mismatch in quality or branding.
Marketing Your Steam Demo
Publishing a demo is only half the job.
The real opportunity begins after players download it.
A successful Steam demo should become part of your overall marketing strategy, helping you generate wishlists, collect feedback, improve your game, and build momentum toward launch.
Think of your demo as the bridge between discovering your game and deciding to buy it.
Using Your Demo to Increase Wishlists
Every player who finishes your demo should know exactly what to do next.
Your primary call-to-action should always be:
Wishlist the full game.
This message can appear naturally in several places:
- After the final level or boss.
- On the completion screen.
- In the main menu.
- On the pause menu.
- Within your Steam Store page description.
Don’t overwhelm players with multiple calls-to-action.
Focus on the single action that contributes most to your launch success.
Preparing for Steam Next Fest
Steam Next Fest has become one of the most important marketing opportunities for indie developers.
Thousands of players actively browse demos during the event, making preparation essential.
A typical timeline might look like this:
3 Months Before
↓

Finalize Demo Content

↓

2 Months Before

Internal Testing

↓

1 Month Before

Public Demo Release

↓

Collect Feedback

↓

Steam Next Fest

↓

Patch Quickly

↓

Launch
Launching your demo shortly before the festival gives you time to identify bugs while ensuring the experience remains fresh.
How Long Should Players Stay in Your Demo?
Player engagement matters more than raw playtime.
Rather than asking:
“How long is my demo?”
Ask:
“How much value does every minute provide?”
For most genres:
| Genre | Recommended Playtime |
|---|---|
| Roguelike | 20–40 minutes |
| Deckbuilder | 30–60 minutes |
| Action | 20–40 minutes |
| Strategy | 45–90 minutes |
| Simulation | 45–90 minutes |
Avoid padding your demo with repetitive content simply to increase its length.
A shorter, memorable experience is often more effective.
Collect Feedback Early
One advantage of releasing a demo is the opportunity to improve your game before launch.
Encourage players to share feedback through:
- Steam Community Hub
- Discord
- In-game feedback forms
- Social media
Try asking specific questions, such as:
- Which mechanic was most enjoyable?
- Was anything confusing?
- Did the difficulty feel fair?
- Were there technical issues?
- Would you wishlist the full game?
Specific questions produce much more useful feedback than asking whether players “liked the game.”
Learn From Player Behavior
Feedback isn’t limited to written comments.
Observe how players interact with your demo.
For example:
- Do many players quit during the tutorial?
- Do they reach the boss?
- Which upgrades do they choose?
- Which weapons or cards are rarely used?
- Where do they lose most often?
Patterns often reveal problems more clearly than individual opinions.
Turning Feedback Into Improvements
Not every suggestion should become a feature.
Instead, look for recurring themes.
If dozens of players report the same issue, it’s probably worth investigating.
Prioritize improvements that:
- Reduce confusion.
- Improve onboarding.
- Increase performance.
- Strengthen your core gameplay loop.
- Remove unnecessary frustration.
Small improvements before launch can significantly increase review scores later.
Keep Updating the Demo
Your demo shouldn’t remain static for months.
As the main game improves, consider updating the demo to reflect those improvements.
Examples include:
- Better balance.
- Improved performance.
- Updated visuals.
- Revised tutorial.
- New controller support.
- Bug fixes.
Players often revisit demos during major Steam events, so keeping them current reinforces confidence in your project.
Measuring Demo Success
Success isn’t measured solely by download numbers.
Instead, evaluate several metrics together.
Important indicators include:
- Demo downloads.
- Wishlist growth.
- Store page visits.
- Average playtime.
- Completion rate.
- Community engagement.
- Creator coverage.
- Bug reports.
Tracking trends over time provides a more complete picture than focusing on a single statistic.
Case Study: Using the Velato Demo as a Marketing Tool
Imagine Velato releasing a public demo one month before Steam Next Fest.
The team could structure its campaign like this:
Week 1
- Publish the demo.
- Announce it on social media.
- Invite Discord members to play.
Week 2
- Collect balance feedback.
- Patch major issues.
- Share community clips.
Week 3
- Release a trailer update featuring improved gameplay.
- Reach out to streamers and content creators.
Steam Next Fest
- Participate in livestreams.
- Respond to community questions.
- Release quick bug-fix patches if necessary.
Launch
- Convert demo players into customers through wishlist reminders and launch announcements.
This staged approach keeps the game visible while continuously improving the player experience.
Integrating Your Demo With Your Marketing Funnel
Your demo should work together with every other element of your Steam marketing.
A simplified funnel looks like this:
Steam Discovery

↓

Capsule Art

↓

Store Page

↓

Trailer

↓

Screenshots

↓

Play Demo

↓

Wishlist

↓

Launch

↓

Purchase

↓

Review
Each stage supports the next.
A great demo cannot compensate for a weak Store page, but when combined with strong artwork, tags, trailers, and screenshots, it becomes a powerful conversion tool.
Steam Demo Launch Checklist
Before making your demo public, verify the following:
Store Page
- ✅ Capsule assets updated.
- ✅ Trailer uploaded.
- ✅ Screenshots reflect the current build.
- ✅ Store description matches the demo.
Technical
- ✅ Stable frame rate.
- ✅ No game-breaking bugs.
- ✅ Save system tested.
- ✅ Controller support verified.
- ✅ Steam Cloud configured correctly.
- ✅ Localization checked.
Gameplay
- ✅ Tutorial is clear.
- ✅ Core gameplay introduced quickly.
- ✅ Progression feels rewarding.
- ✅ Ending encourages wishlisting.
Marketing
- ✅ Demo announcement prepared.
- ✅ Press kit updated.
- ✅ Content creator outreach completed.
- ✅ Discord server ready for feedback.
- ✅ Social media posts scheduled.
Frequently Asked Questions
Should every indie game have a demo?
Not necessarily.
Games that benefit most from demos include:
- Roguelikes
- Strategy games
- Deckbuilders
- Simulation games
- Action RPGs
Narrative-heavy games may prefer shorter demos to avoid revealing too much of the story.
Can I update my demo after release?
Yes.
Many developers release multiple demo updates before launch.
Keeping the demo current demonstrates active development and helps address community feedback.
Should demo saves transfer to the full game?
If possible, yes.
Allowing players to continue their progress creates a smoother transition and rewards those who supported your game early.
However, ensure the implementation is secure and doesn’t introduce progression exploits.
Should I remove my demo after launch?
It depends on your strategy.
Some developers keep demos available permanently to continue attracting new players.
Others remove them after launch to focus attention on the full game.
Evaluate which approach best fits your genre, pricing model, and long-term marketing goals.
Final Thoughts
A Steam demo is more than a free sample—it’s one of the most effective ways to earn player trust before launch.
When thoughtfully designed, a demo showcases your core gameplay, highlights what makes your game unique, and gives players a compelling reason to wishlist the full release.
Throughout this guide, we’ve used Velato as an example because its poker-based roguelike mechanics are particularly well suited to a focused gameplay slice. By introducing the core bluffing system, offering a curated selection of encounters, and ending on a satisfying cliffhanger, the demo can communicate the game’s identity while leaving players eager for the complete experience.
Whether you’re preparing for Steam Next Fest or planning your first public reveal, treat your demo as a polished product rather than an unfinished prototype. Every interaction—from the first battle to the final wishlist prompt—shapes how players perceive your game.
A great demo doesn’t try to show everything.
It shows just enough to make players want more.
Related Posts
- How to Set Up a Store Page on Steam
- Steam Tags Explained: How to Choose the Best Tags for Your Indie Game
- Steam Capsule Art Guide: Design Tips That Increase Click-Through Rate
- Steam Trailer Best Practices
- What Is an Indie Game?
- Velato: A Poker Roguelike Worth Watching
References
Official Steamworks Documentation
- Steamworks Documentation – Demos
https://partner.steamgames.com/doc/store/application/demos - Steamworks Documentation – Steam Next Fest
https://partner.steamgames.com/doc/marketing/upcoming_events/nextfest - Steamworks Documentation – Store Presence
https://partner.steamgames.com/doc/store - Steamworks Documentation – SteamPipe Build System
https://partner.steamgames.com/doc/sdk/uploading
Additional Resources
- SteamDB – https://steamdb.info/
- GameDiscoverCo – https://newsletter.gamediscover.co/
- HowToMarketAGame – https://howtomarketagame.com/